![]()
Hi all I’ve managed to write the first part of the AnimEditor manual .
This first part serves as an introduction to 2d animations and also explains a little bit of the AnimEditor basic functionality by creating a simple animation.
Enjoy.
Thank you for downloading the AnimEditor, I’ve worked very hard to ensure this tool works as intended. I hope you enjoy using the AnimEditor in your projects.
Have fun!
OVERVIEW:
The AnimEditor is a tool that helps you create 2D animations specifically geared towards games.
In games it is desirable to have all of the graphic resources merged together within the fewest possible number of image files (bmp, png, tiff, dds, etc..).
This is required because video cards take some precious time locking an image and reading its data before it can be displayed (presented) to the screen , by using the fewest amount of images possible we can ensure that we are getting the most of our video and memory resources available.
The Animeditor is helpful in these situations because it allows the user to create the animations in a visual enviroment.
Here is an example.
Consider that our game has the following resource to work with:

This image bank (bank from now on) contains all of the required graphics for displaying a character within our game.
Let’s suppose we want to specify the walking animation, in this case we would need to find the coordinates of the following frames:

For this to work we need to find the orgin of each rectangle and also their dimensions (width, length). Additionally we would need to know how long each frame should be displayed on to the screen.
As you may realize this is a lengthy process if you do it all by hand, maybe you are lucky and you have a graphic artist that is willing to pre-format all of the game’s sprite in cells but you will be wasting precious image space , specially if you have sprites of different dimensions in the same bank. (which generally tends to be the case)
So basically what the AnimEditor does is to give the user the ability to find the rectangle’s coordinates and also determine the duration for each frame withing the animation.
Not only this but you will be able to compose complex animations by using the power of objects and the linear interpolation commands. (more on this later)
MAIN WINDOW:
Here is a brief description of the many componets that form part of the main window:

-
This is the application’s main menu, from here you can Save & Load animations, change the windows visibility, Issue copy / paste commands, launch the preview window and much more, I suggest you explore it a little bit because there are many useful hotkeys that will help you with your development.
-
This is the object properties display: Whenever you select a frame you will be able to see and modify that selected frame. For example: in this window you will be able to change the scale or the position of any given frame that is currently selected
-
This is the object properties display: Whenever you select a frame you will be able to see and modify that selected frame. For example: in this window you will be able to change the scale or the position of any given frame that is currently selected
-
This is the selection cursor: This magenta thing shows all of the frames that are currently selected. You can make selections of more than one frame as long as they are consecutive. (you cannot select every odd frame for example)
-
This is the mini-preview window: Here you will have a basic preview of how the selected frame looks. Note that if you select multiple frames you will be able to only see the first selected frame (you will notice it has a different color within the selection area)
-
This is the mini-preview window: Here you will have a basic preview of how the selected frame looks. Note that if you select multiple frames you will be able to only see the first selected frame (you will notice it has a different color within the selection area)
-
This is the bank list: This window will show all of the banks that are currently loaded into memory.
-
This window will show a preview of any selected image bank from the list.
PREVIEW WINDOW:
Here follows a quick description of the preview window, the preview window will allow you to preview your current animation and will also help you make changes to your animations so you can achieve precise animations.

-
This is the main menu here you can close the preview window or change the animation screen settings (here you can specify the resolution you are targeting as well as the offset area)
-
This is the animation controls here you can position yourself in any frame that you want, also you can change the framerate speed on which the animation plays (60fps, 30fps and so on) there is also a starting and ending frame numbers in case you want to review a specific portion of the animation (without playing the entire animation over and over again)
-
This are the animation playback commands here you can rewind, forward, play normally, play continuously or play back and forth, there is also a stop button (note that you cannot make modifications to the animation while the animation is playing, you have to stop the animations first before making changes)
-
This is the object list, this helps you select which object within the current frame you want to work with, note that you can select multiple object but when doing so you will have focus on the first selected object, you will be able to apply modifications to all objects at the same time.
-
This is the property bar here you can change many properties for the current selected object (or objects) without leaving the preview window. Also you can load a background image for guidance; also you can turn on the grid for precise positioning of objects.
-
This is the preview area. If your screen settings are bigger than the preview window dimensions you will be able to scroll through using the scrollbars.
QUICK START EXAMPLE
Here is a tutorial for creating a basic walking animation using the previous mentioned image bank. Please follow these steps in order to get the animation done.
1. Start the application

2. Load the image bank


3. Use the Object Assign tab to make the selection of the four frames be dragging a rectangle over the desired frames and then clicking the Create Frame button. Note that you don’t have to make precise selections at this point, you can refine your objects later on easily.
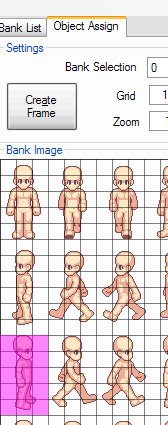
4. Click on each object on the main window and now make sure your selection is good and you don’t see portions of other frames.

To fix this (if you are using the same image bank) make sure you have the following U,V coordinates
Frame 0: W: 48 H: 80 U: 0 V: 175
Frame 1: W: 48 H: 80 U: 48 V: 177
Frame 2: Copy and paste frame 0
Frame 3: W: 48 H: 80 U: 99 V: 176
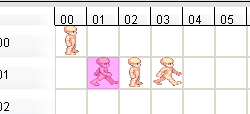
Note that, in this case, all of our frames have the same dimension. To quickly set the same dimension to all of our frames you can use the following trick.
1. Make sure the first frame has the correct dimensions
2. Select all of the frames starting from the first frame like this:
Now in the W box just click the UP arrow (this will increase the width to 49 to all of the current selected objects) and then click the DOWN arrow (this will decrease the width to the original 48 but for all of the selected objects).
Repeat this procedure for the H value (or any value that you want for that matter).
5. Launch the preview window and preview your animation, it will look messed up but its ok you need to configure the preview settings before getting a good result.
6. Set the FPS limit to 5 FPS this is just a quick fix, later you will learn how to adapt this animation for a 60FPS environment.
7. Check that the start frame is set to 0
8. Check that the end frame is set to 3
9. Now your settings are correct, try playing the animation by clicking the play button.
10. Enjoy your animation.
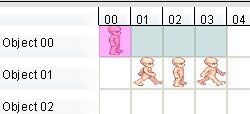
11. To fix the animation so it looks good in a 60FPS game you need to duplicate the frames several times.
12. Select from the frame 01 to the frame 03
13. CUT the selected frames
14. PASTE the clipboard to the object 2 (you can paste it wherever you want but I tend to do this for easy visualization)
15. Copy the frame 0
16. Within the object 00 select the first 4 frames (from 0 to 3)
17. PASTE the clipboard (this will paste the clipboard to the current selected area)
18. Repeat this process for the 3 remaining frames be sure you don’t over write any frames on object 0 make sure you are placing them consecutively.
19. Go back to the preview window (you can use the hotkey F3) and set back the FPS settings to 60 and set your starting frame to 0 and your ending frame to 15.
20. Enjoy you animation!


I hope you have enjoyed this introduction to the AnimEditor and I hope you start using this tool seriously in your games.
The second part of this tutorial will be coming soon, in the second part I will be teaching some of the more advanced techniques this editor has to offer and also I will list the complete hotkey list.
Good luck!

Very nice indeed! Keep up the good work!
By: Patrik on May 26, 2009
at 12:12 pm
¿Pero como se puede utilizar estos xamm en un proyecto XNA?
By: Urza on March 30, 2010
at 11:09 pm
lo mismo pregunto men como hago para usar los archivos de animación en mi juegito ?
By: Darkus on June 6, 2011
at 2:19 am